JupyterLab
Introduction
JupyterLab is an interactive development environment that combines the flexibility of Jupyter notebooks with the power of a full IDE. It provides a web-based interface for working with notebooks, code, data, and visualizations in a single integrated environment.
Key features include:
Interactive Python notebooks with code, text, and visualizations
Support for multiple programming languages via kernels
File browser and text editor
Terminal access
Extensions for additional functionality
Running JupyterLab locally
Use a Conda environment to keep JupyterLab and its dependencies isolated from your base environment.
Create a Conda environment (e.g. with Python 3.11):
conda create -n jlab-env python=3.11
Activate the environment:
conda activate jlab-env
Install JupyterLab inside this environment:
conda install jupyterlab
# or, if you prefer conda-forge:
# conda install -c conda-forge jupyterlab
Launch JupyterLab locally:
jupyter labOpen JupyterLab in your browser:
Open the URL displayed in the terminal (typically
http://localhost:8888). Keep this terminal open while you are working in JupyterLab.Stop the JupyterLab server:
When you are finished working, you can terminate the JupyterLab server by pressing
Ctrl+Cin the terminal where it was started. This will stop the server and free up the port.
Note
When you start JupyterLab from within the activated Conda environment, it will automatically use that same environment as the default kernel for running code. This ensures full isolation of dependencies and consistent behaviour for your project.
Alternative: System-wide JupyterLab with Conda kernels
You can also install JupyterLab once on your system (macOS, Linux, or Windows) and then make your Conda environments available as kernels inside that JupyterLab.
Install JupyterLab in base environment or a shared environment:
On macOS or Linux (using
condaorpipin a base or shared Python):conda activate base conda install jupyterlab # or: conda install -c conda-forge jupyterlab
On Windows, you can do the same from the Anaconda Prompt or a standard terminal.
For each Conda environment you want to use as a kernel:
Activate the environment:
conda activate myenv
Install the IPython kernel package inside that environment:
conda install ipykernel
# or: pip install ipykernel
Register the environment as a Jupyter kernel:
python -m ipykernel install --user --name myenv --display-name "Python (myenv)"
After this step, the environment
myenvwill appear in the JupyterLab kernel list asPython (myenv).Launch the system-wide JupyterLab:
From wherever JupyterLab is installed (e.g. base or shared env):
jupyter labSelect the desired Conda kernel in JupyterLab:
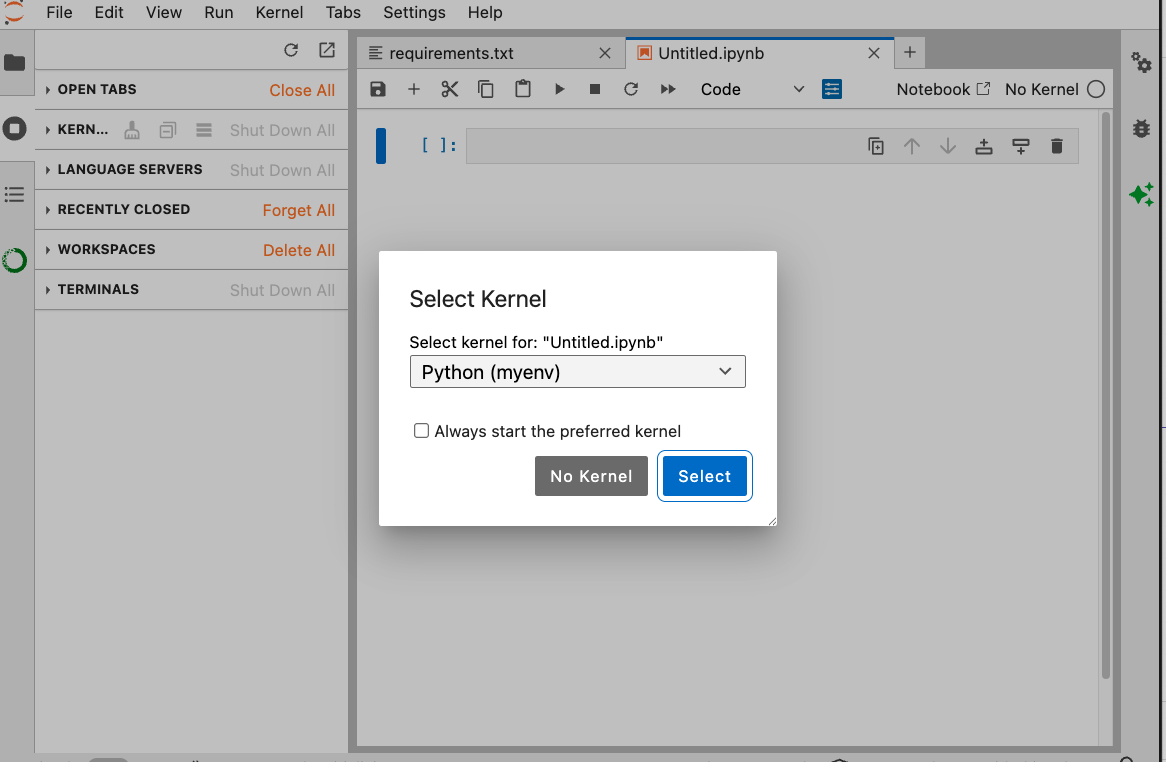
Create a new notebook.
Use the Kernel or Launcher menu to pick the kernel, e.g.
Python (myenv).
Tip
This setup allows you to maintain one central JupyterLab installation while still using multiple isolated Conda environments as kernels for different projects.
JupyterLab Desktop application
The JupyterLab Desktop application provides a native desktop interface (none browser based) for JupyterLab on macOS, Windows, and Linux.
Install JupyterLab Desktop:
Download the installer for your operating system (macOS, Windows, Linux) from the official page:
Make your Conda environments available as kernels:
Follow step 2 from the previous section to install the
ipykernelpackage in each environment and register it as a kernel.This ensures that your Conda environments show up as selectable kernels inside JupyterLab Desktop.
Launch JupyterLab Desktop and choose a Conda kernel:
Open the JupyterLab Desktop app.
Create a new notebook or open an existing one.
Choose the desired Conda kernel via the Kernel menu or Launcher.
JupyterLab Extensions
JupyterLab supports extensions that add functionality to the interface. Some useful extensions include:
jupyterlab-git: Git integration for version control
jupyterlab-lsp: Language Server Protocol support for better code completion
jupyterlab-drawio: Diagram editing
jupyterlab-go-to-definition: Navigate to variable/function definitions
To install extensions:
# Install using pip
conda install jupyterlab-git
# Or
conda install -c conda-forge jupyterlab-git
Note
Extensions installed in one environment are only available when using that environment’s kernel.
Running JupyterLab on the CoSTAR cluster
Via Open OnDemand
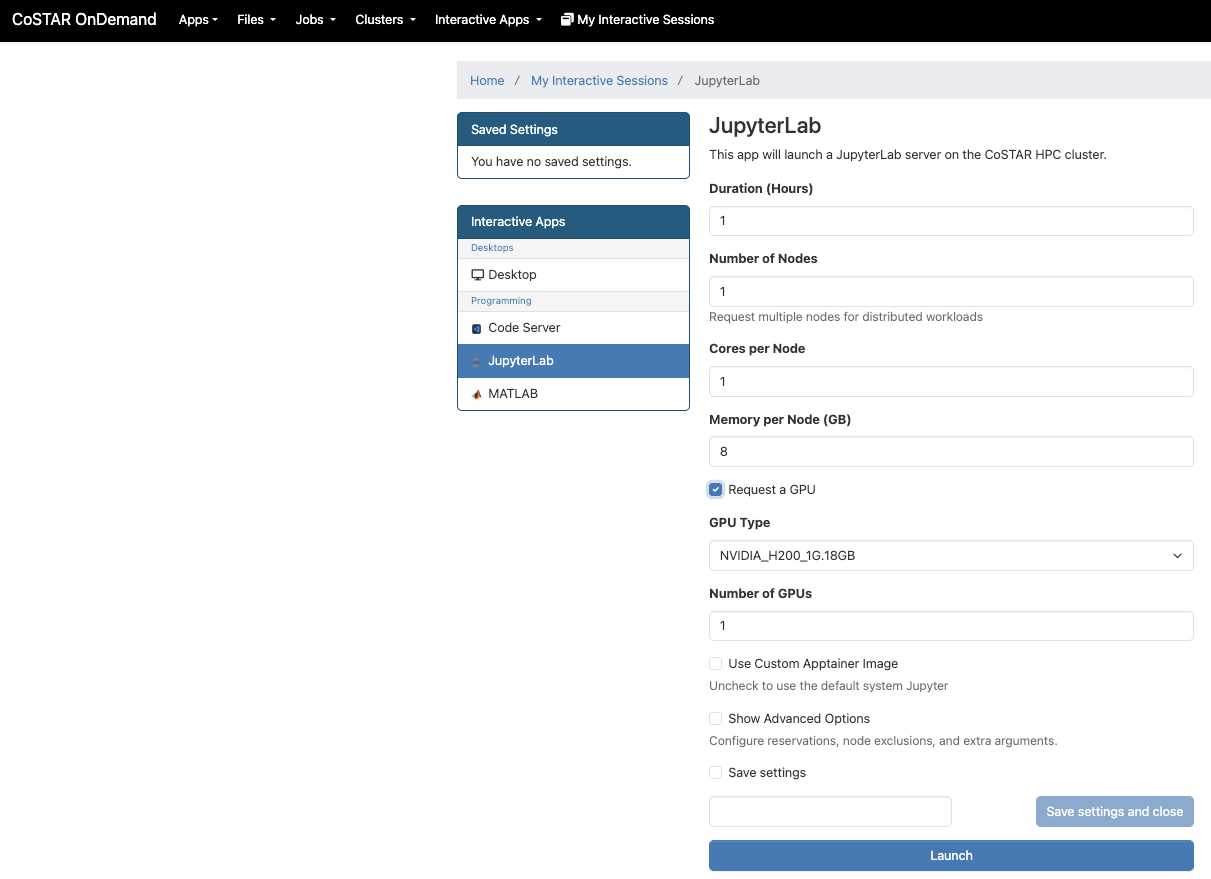
First, log in to Open OnDemand.
Choose the JupyterLab interactive app, set resources (partition/GPUs, duration), and launch.
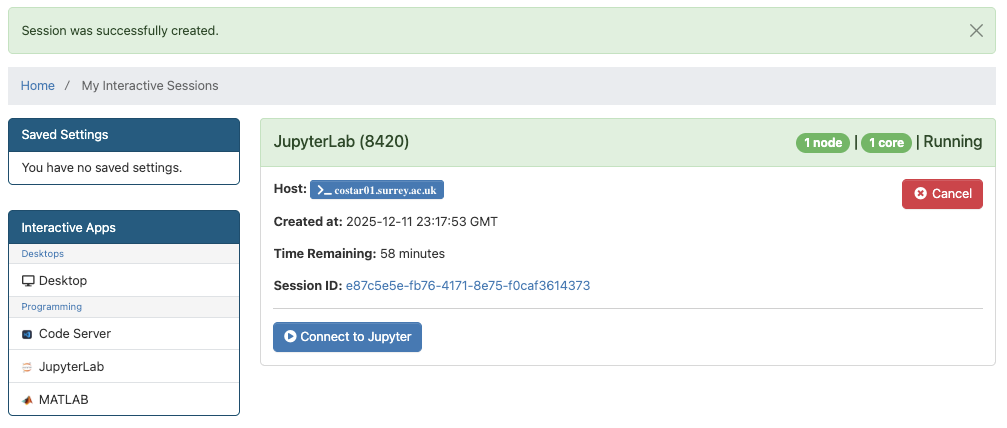
When the session starts, click “Connect to Jupyter” to open JupyterLab in your browser.
Stop the session when done to free resources.
Via SSH tunneling
On the CoSTAR cluster, create a conda environment and install JupyterLab.
SSH to the CoSTAR login node and start an interactive job on a compute node:
ssh <username>@costar-login01
# after login start an interactive session on one of the compute nodes and specify resources (partition, GPU, RAM)
srun -N 1 --time=00-00:25:00 --pty bash
On the compute node start JupyterLab without opening a browser. Pick a free port (e.g. 8888):
jupyter lab --no-browser --port=8888
On the compute node run
hostnameto determine the compute node name (e.g.costar01).From your local machine, open another terminal and create the first tunnel to the login node:
ssh -L 8888:localhost:8888 <username>@costar-login01.surrey.ac.uk
From that same terminal (or a second one), open the tunnel from the login node to the compute node you are on (replace
costar01with your node name):ssh -L 8888:localhost:8888 costar01
The two tunnels forward your local port 8888 to the JupyterLab instance on the compute node.
In your local browser, go to http://localhost:8888 and paste the token from the JupyterLab terminal output.
When finished, stop JupyterLab (Ctrl+C) and exit the compute node shell to release resources.

Screenshot jupyter url + token.
SSH Key-based logins to avoid repeated prompts
Double SSH tunnels prompt for your password twice unless you use SSH keys with agent forwarding. Create a key, load it into your local SSH agent, and copy the public key to CoSTAR so both hops can reuse it:
ssh-keygen -t rsa
ssh-copy-id <username>@costar-login01
When you open your tunnels, add -A so the agent is forwarded and the same key is used on both hops (login node and compute node). For example, a single jump command looks like:
ssh -A -J <username>@costar-login01 -L 8888:localhost:8888 <username>@costar01
See Generating SSH Keys for more details and options.
Troubleshooting
Common issues and solutions:
Kernel connection problems:
- Restart the kernel via “Kernel -> Restart Kernel”
- Check that the kernel environment is properly installed
- Verify that the kernel was registered correctly with jupyter kernelspec list
Port conflicts:
- If port 8888 is in use, specify a different port: jupyter lab --port=8889
- On the cluster, you may need to use the port assigned by the scheduler
Performance issues on cluster: - Reduce memory usage by closing unused notebooks - Use smaller datasets or sample data for development - Consider using Dask or other distributed computing tools for large workloads
Token authentication problems:
- If the token doesn’t work, generate a new one with jupyter lab --NotebookApp.token='' (not recommended for production)
- On the cluster, copy the full token including any special characters
Security Best Practices
Never expose local JupyterLab to public networks without proper authentication
Use strong tokens on shared systems
Clean up unused kernels to free resources
Remove sensitive data from notebooks before sharing
Use virtual environments to isolate project dependencies
Cleanup and Maintenance
To remove unused kernels:
jupyter kernelspec remove myenv
To uninstall JupyterLab:
# For conda environments
conda remove --name jlab-env --all

# For pip installations
pip uninstall jupyterlab
To clean up extension files:
jupyter lab clean